Building Real-time Public Transport Tracking System on Azure - Part 2 - Data Collectors & Composer
This is next post in series about real-time public transport tracking system development based on Azure infrastructure and services. This article is a part of Applied Cloud Stories initiative - aka.ms/applied-cloud-stories.
Blog posts in this series:
- Part 1 - Scene Background & Solution Architecture
- Part 2 - Data Collectors & Composer
- Part 3 - Event-Based Data Delivery
- Part 4 - Data Processing Pipelines
- Part 5 - Data Broadcast using gRPC and SignalR
- Part 6 - Building Frontend
- Part 7 - Packing Everything Up
- Part 7.1 - Fixing Docker Image Metrics in Azure
Background
As I wrote in previous post - buses have devices installed from various vendors on-board (let’s name those A, B, C and D). Data collection happens with the help of Azure Functions (mostly). We picked serverless deployment schema here because we do have bunch of code fragments that are running on different frequencies. Timer based function execution is the best option you can get in this case. As application developer I don’t need to worry about ensuring that timer goes off at precise moment in time and I don’t need to worry about making sure that timer goes off again after particular period of time. I don’t need to worry about scaling and banging my head against the wall when I would be debugging concurrent code when my custom made infrastructure would decide to fire off another instance of the code to run in parallel. It’s all taken care by Azure Functions runtime and I can focus on my portion of the application.
This is the overall data-flow image of our system: 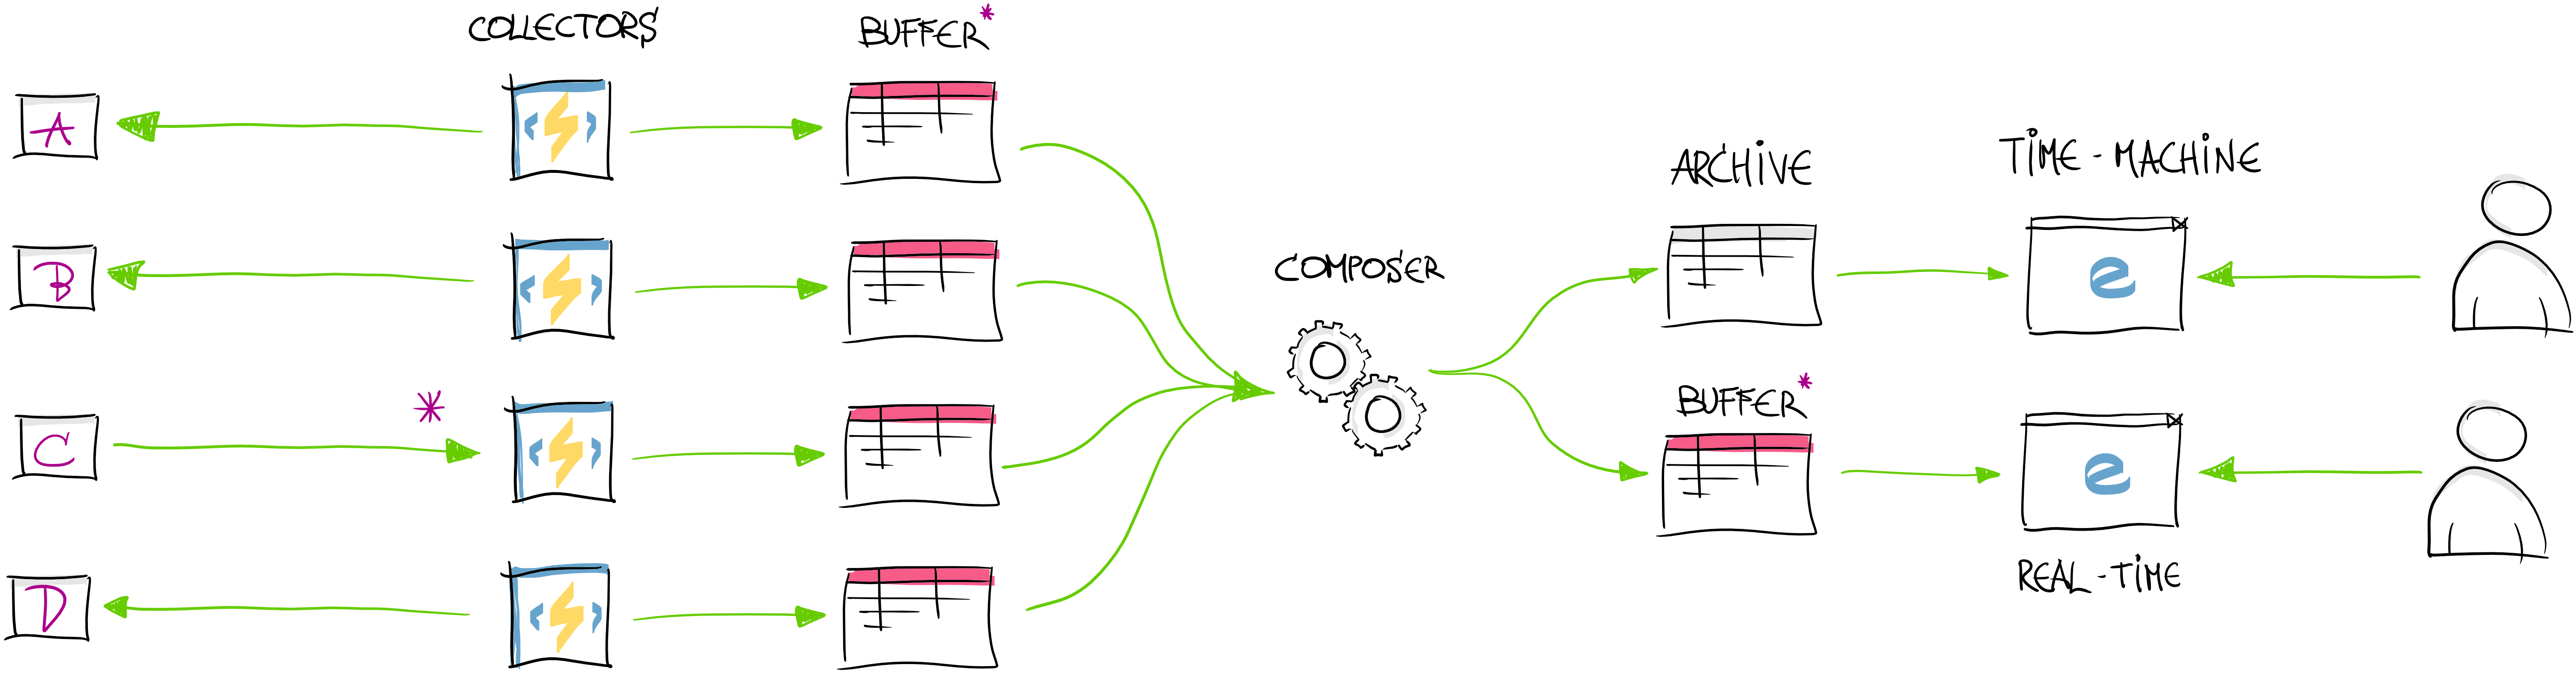
We are currently talking about these two specific areas:

Data Collectors
Collectors are bunch of Azure Functions that are set to be executed on different frequencies based on timer triggers:
1
2
3
4
5
[FunctionName("CollectorFunc1")]
public static async Task Run([TimerTrigger("*/1 * * * * *")] TimerInfo myTimer, TraceWriter log)
{
    ...
}
There is nothing interesting to see here. It’s just a function that is set to run every second (frequency = 1Hz). The fancy string in TimerTrigger attribute constructor is CRON expression for scheduling when function needs to run. If you get into trouble to understand or customize that expression - I usually use this cheat sheet to help me get started.
Most of the time function body consists of some service client that connects to vendor’s endpoint and collects data about buses.
Receivers instead of Collectors (“Push” Data Processing)
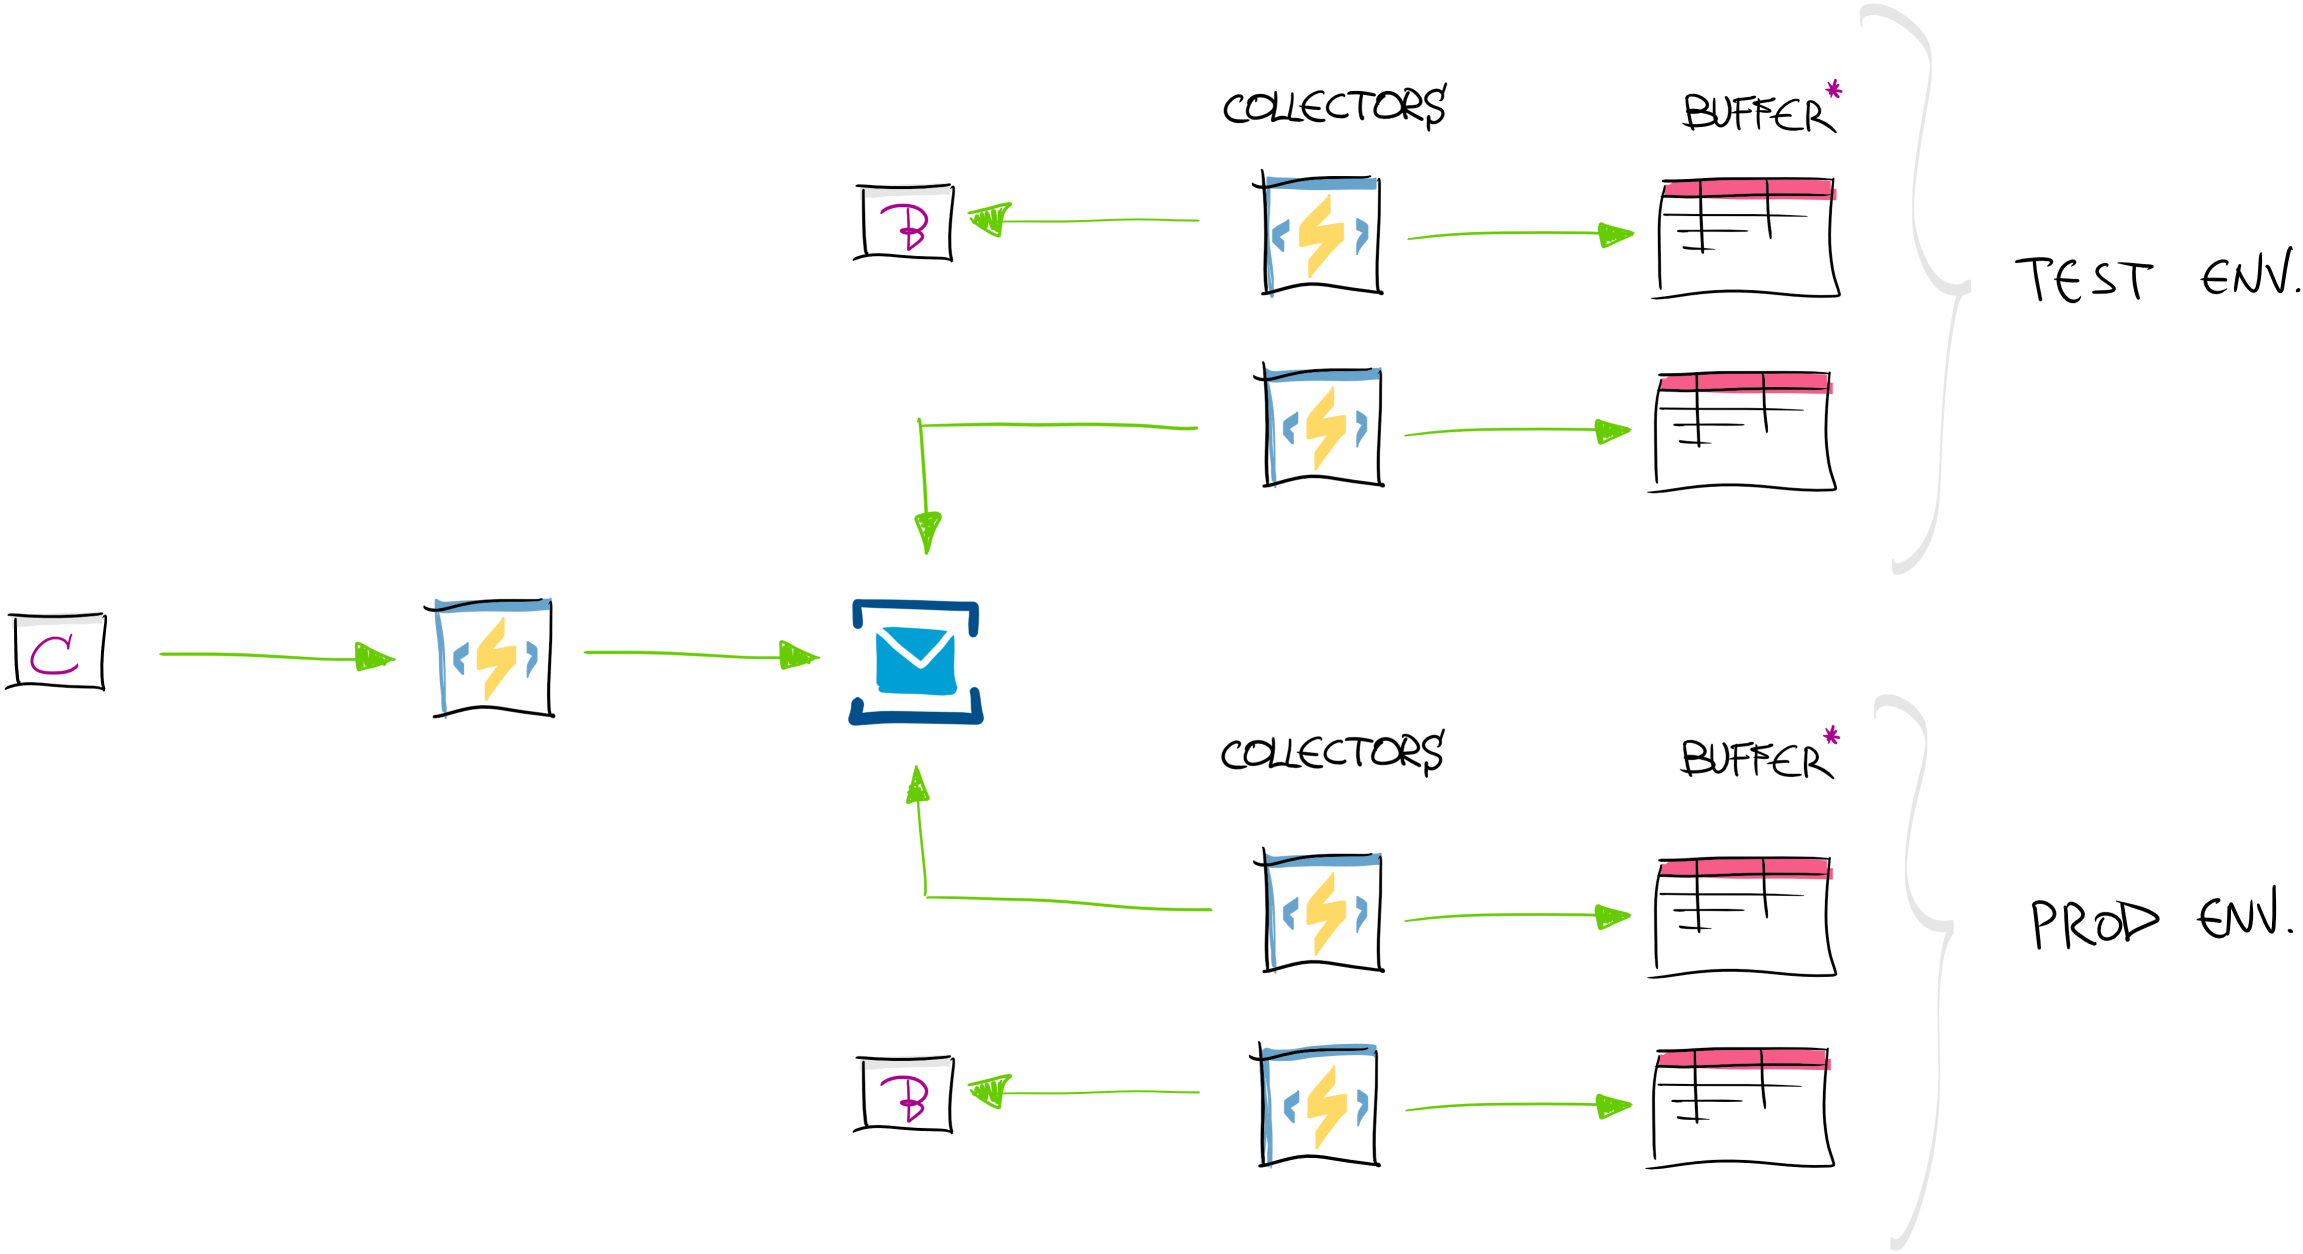
However, sometimes vendor can only push data to our endpoint. Even more interesting is that some of the vendors can only do that from production environment (e.g. feeding us with only real-life data). Here we need to be creative and provide “production” & “test” feeds for ourselves. What we implemented is production data “receiver” in front which is acting as “data broker” and provides data further for our functions. Once data is received from vendor, we use Azure ServiceBus messaging infrastructure to pass data further to our collectors in test and production environments. ServiceBus Topics are ideal for us in this solution.
There are few things that needs to be done in order to get this “push architecture” working:
- Ensure that ServiceBus topics exists. It’s great when you don’t need to deal with some infrastructure element creation and management - and it’s done straight from the application. During receiver code startup we ensure that required ServiceBus topics are created. We reuse many services and repositories across .NET Core & .NET Framework and there are also few things to keep in mind when reusing the same code across those platforms. For example
connectionStringAccessoris our own abstraction to get access to connectionStrings fromweb.configorsettings.jsonfile. More info can be found in post about migrating Azure WebJob from .NET framework to .NET Core.
1
2
3
4
5
6
7
8
9
10
11
12
13
14
15
16
private async Task EnsureTopicIsCreatedAsync(CancellationToken cancellationToken)
{
    var connectionString = _connectionStringAccessor.GetConnectionStringMyName("..");
    var nm = new ManagementClient(
        new ServiceBusConnectionStringBuilder(connectionString).GetNamespaceConnectionString());

    if(!await nm.TopicExistsAsync("TopicName", cancellationToken).ConfigureAwait(false))
    {
        await nm.CreateTopicAsync(
            new TopicDescription("TopicName")
            {
                EnableBatchedOperations = true
            },
            cancellationToken).ConfigureAwait(false);
    }
}
- Write received messages to the topic
1
2
3
4
5
6
7
8
9
10
private async Task SendAsync()
{
    var str = connectionStringAccessor.GetConnectionStringMyName("...");
    var topicClient = new TopicClient(str, "TopicName");
    await _topicClient.SendAsync(new Message
    {
        Body = body,
        ContentType = "text/plain"
    }).ConfigureAwait(false);
}
- Batch processing messages on “collector” side. Next thing is to aggregate and collect all messages sent to ServiceBus topic.
Ensuring that topic subscription is created with correct characteristics:
1
2
3
4
5
6
7
8
9
10
11
12
13
private static void InitializeSubscription(string connection)
{
    var namespaceManager = NamespaceManager.CreateFromConnectionString(connection);
    if (namespaceManager.SubscriptionExists("TopicName", "SubscriptionName")) return;

    var sd = new SubscriptionDescription("TopicName", "SubscriptionName")
             {
                 EnableBatchedOperations = true,
                 Status = EntityStatus.Active
             };

    namespaceManager.CreateSubscription(sd);
}
Then we can collect messages in batch (by peeking into the subscription looking for new messages):
1
2
3
4
5
6
7
8
9
10
11
12
13
14
15
16
17
18
public async Task Collect()
{
    var factory = MessagingFactory.CreateFromConnectionString(_serviceBusConnection);
    var subscriptionClient = factory.CreateSubscriptionClient("TopicName", "SubscriptionName", ReceiveMode.ReceiveAndDelete);
    subscriptionClient.PrefetchCount = 16;

    while(subscriptionClient.PeekBatch(16).Any())
    {
        var pendingMessages = subscriptionClient.ReceiveBatch(16, TimeSpan.FromSeconds(1))?.ToList();
        if(pendingMessages != null)
        {
            foreach(var message in pendingMessages)
            {
                // do processing of the message
            }
        }
    }
}
Batch size of 16 is more or less arbitrary choice here. We tested with few selected batch sizes and seems 16 worked out best for us.
Saving the Space (and Time)
Most of the time (when runtime Gods are good to us) collectors and composer are running on 1Hz frequency - meaning that there is a lot of data generated and saved every second. Azure Storage is cheap (really cheap!). Before our refactoring we were using standard way JSON.NET library to “hibernate” our domain model to some persistence layer and save it to some durable storage. However, we introduced binary serialization for this data. We reviewed couple of libraries and decided to go with MessagePack.
We decided to go with binary format not for the sake of space, but for the time it takes to convert from C# object model to byte[].
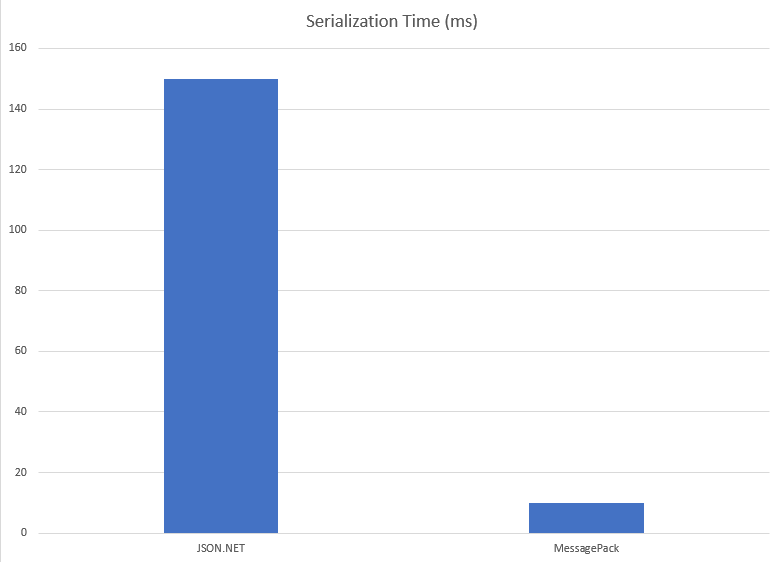
Overall we were able to cut off space requirements from ~ 1.5MB down to ~1.1MB. It’s almost 1/4 of the space.
Code for adding MessagePack to the solution is not complex at all:
1
var serializedSnapshot = BinaryConverter.Serialize(newSnapshot);
1
2
3
4
5
6
7
8
9
10
11
12
13
14
public class BinaryConverter
{
    public static byte[] Serialize<T>(T model)
    {
        if (model == null) throw new ArgumentNullException(nameof(model));

        return MessagePackSerializer.Serialize(model, ContractlessStandardResolver.Instance);
    }

    public static T Deserialize<T>(byte[] bytes)
    {
        return bytes == null ? default(T) : MessagePackSerializer.Deserialize<T>(bytes, ContractlessStandardResolver.Instance);
    }
}
We use ContractlessStandardResolver here because not always we are able to control source code of the model that’s being serialized. I guess if we would go with standard resolver (which is relying on field indexes and attributes) would use even less space.
Data Composer
After data has been collected next step is to compose unified transport data model. Data composer is component between collectors and final data model.
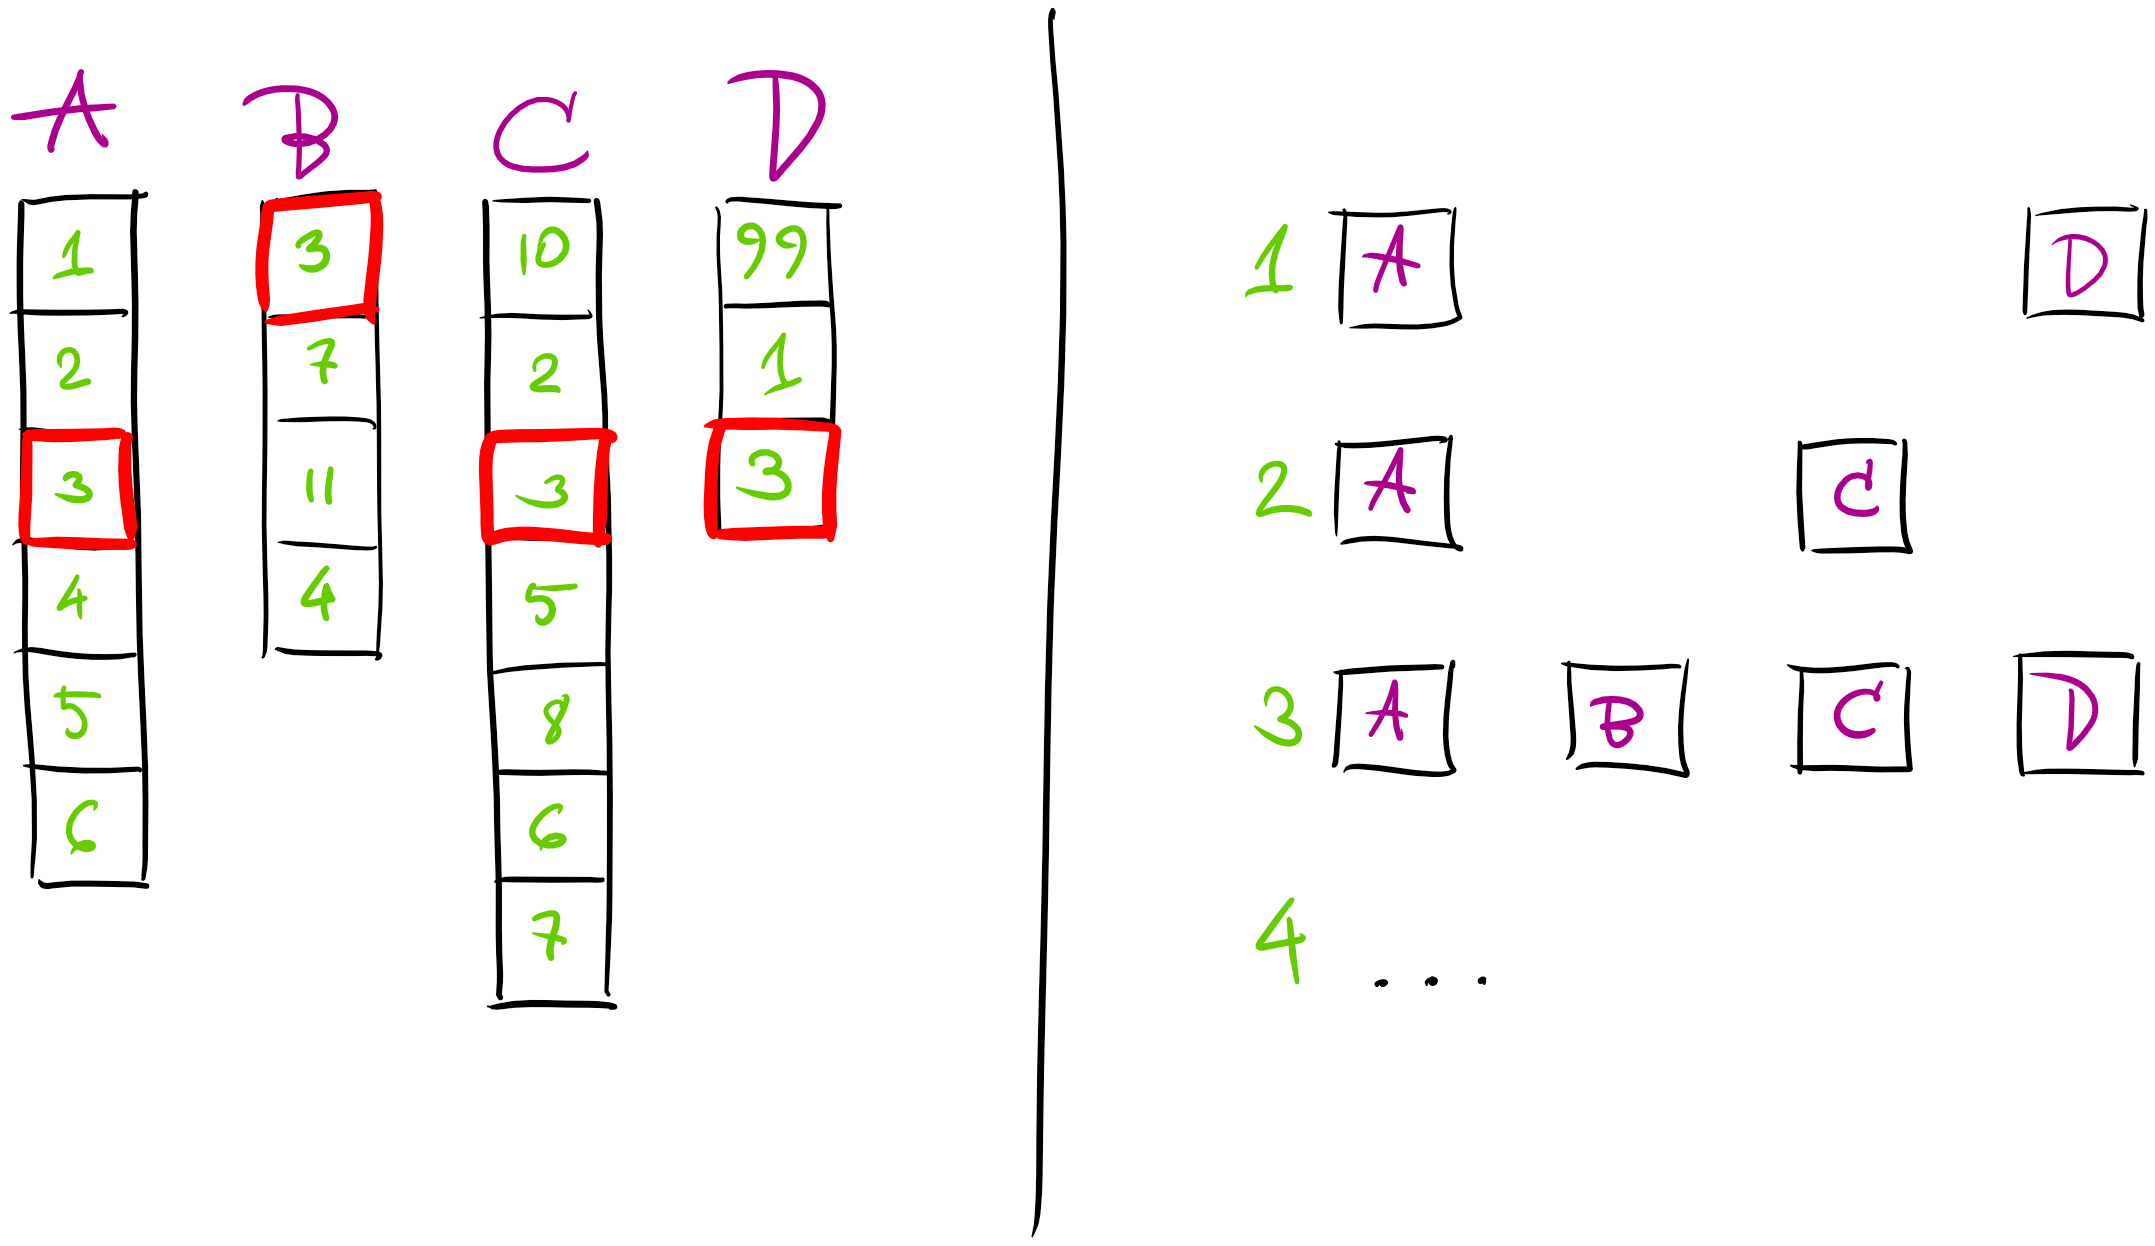
Composition phase starts with getting latest snapshots from collectors for each vendor’s data. Interesting aspect here is that data comes grouped by vendors and not by vehicles. Meaning that we receive for example:
- coordinates (vendor
A) for bus 1,2,3,4,.. - delay information (vendor
B) for bus 3,7,.. - fuel level (vendor
C) for 10,2,3,.. - speed (vendor
D) for 99,1,3,.. - etc
What we need to build after receiving data is aggregated “view” for each of the vehicle:
- vehicle #1 - coordinates, speed
- vehicle #2 - coordinates, fuel level
- vehicle #3 - coordinates, delay, fuel level, speed
- etc..
What we ended up with from data processing architecture perspective is something very similar to “Pipes & Filters” architecture.
Composition process starts with getting all snapshots from all available data sources (collectors).
1
2
3
4
5
6
7
8
9
10
11
Vendor1Response v1Result;
Vendor2Response v2Result;

var v1Task = _v1Repository.GetLatestAsync();
var v2Task = _v2Repository.GetLatestAsync();

Task.WaitAll(v1Task, v2Task);

v1Result = v1Task.Result;
v2Result = v2Task.Result;
...
Pipes & Filters
Process of sorting data by transport we call “matching data points”. This is next step in data processing pipeline. Logic of the matcher is pretty our customer specific (as it involves various decisions how to “glue” together various data sources and by which values).
1
var model = RunMatchers(v1Result, v2Result, ...);
Next step is to execute some common pre-processors (like detecting transport type, assigning ID for the transport, etc).
1
RunCommonPreProcessors(ref model);
NB! We are passing model here by ref not because we need access variable by reference (it is already a reference type - class) but to aware other developers that this method will mutate passed in variable. We find it as nice convention.
Then we need to group vehicles by its transport type (filter) and run configured data processors (pipe) for each of the transport type. This is optimization in the process as we don’t need to execute the same processor for bus and boat transport. Common processors have been executed already in common pre-processor pipeline.
1
2
3
4
5
var buses = model.Items.Where(t => t.TransportType == TransportType.Bus);
var boats = model.Items.Where(t => t.TransportType == TransportType.Water);

RunBusProcessors(ref buses);
RunBoatProcessors(ref boats);
As we are working with reference types here, we can then just to continue with content of model without copying back result from processors.
1
RunCommonPostProcessors(ref model);
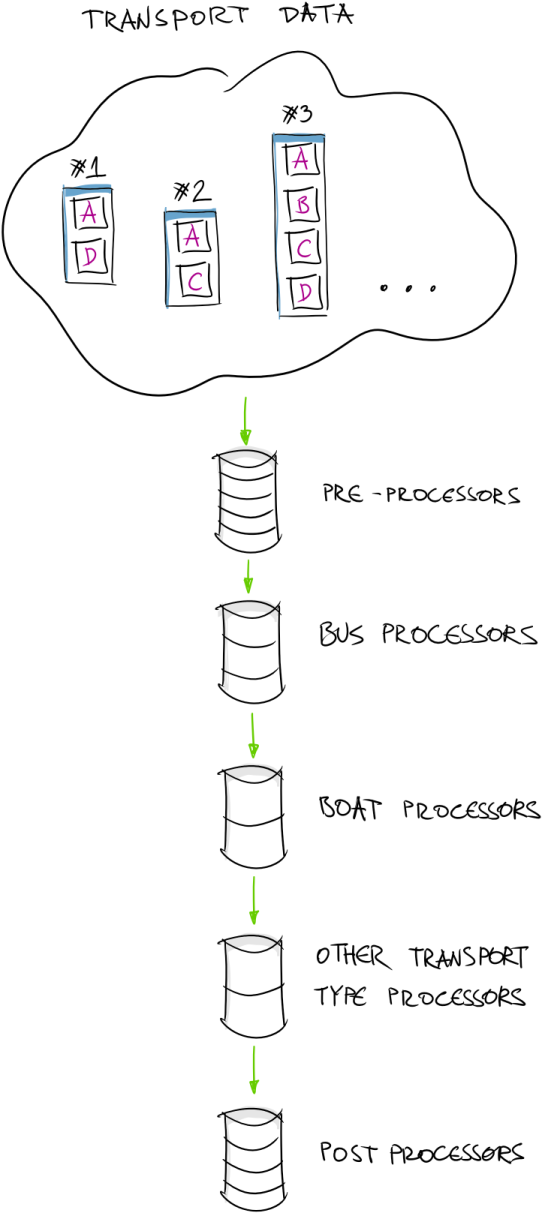
This is how data processing pipeline looks like. Building the pipeline for the processors is truly as simple as creating list of processor instances that implement the same interface:
1
2
3
4
5
6
7
8
9
10
11
12
13
14
15
16
17
18
19
public class Composer
{
    private readonly ICollection<IPreProcessor> _preProcessors;

    public Composer(ICollection<IPreProcessor> preProcessors)
    {
        _preProcessors = preProcessors;
    }

    public void RunCommonPreProcessors(ref TransportDataModel model)
    {
        foreach(var preProcessor in _preProcessors)
        foreach(var item in model.Items)
        {
            var transportData = item;
            preProcessor.Process(ref transportData);
        }
    }
}
We need to capture iteration variable item into separate field transportData in order to avoid CS1675 (info here) and escape read-only limitations.
Durable Azure Functions Fan-Out/Fan-In
NB! Note here is that Data Composer is running on Azure WebJobs infrastructure. You might be wondering why we are not using some Azure Functions benefits? For example, Durable Azure Functions “Fan-Out/Fan-In” scenario as described here. We did! We tried this Fan-Out/Fan-In scenario in our test environment. We split whole transport data array into array of individual vehicle and asked Azure Functions runtime to process it in parallel.
1
2
3
4
5
6
7
8
9
10
11
12
13
14
15
16
17
18
19
20
21
22
23
24
25
26
27
28
29
30
31
32
33
34
35
using Microsoft.Azure.WebJobs.Extensions.DurableTask;

public static async Task<long> Run(IDurableOrchestrationContext durableContext)
{
    Vendor1Response v1Result;
    Vendor2Response v2Result;

    var v1Task = _v1Repository.GetLatestAsync();
    var v2Task = _v2Repository.GetLatestAsync();

    Task.WaitAll(v1Task, v2Task);

    v1Result = v1Task.Result;
    v2Result = v2Task.Result;

    var model = RunMatchers(v1Result, v2Result, ...);
    var tasks = new Task[model.Items.Count];
    for (int i = 0; i < model.Items.Count; i++)
    {
        tasks[i] = durableContext.CallActivityAsync("RunPipeline", model.Items[i]);
    }

    await Task.WhenAll(tasks);

    // save processed model to storage
}

public static async Task RunPipeline(
    [ActivityTrigger] TransportDataModelItem item,
    ILogger log)
{
    // run all pre-processors on `item`
    // run all processors
    // run all post-processors
}
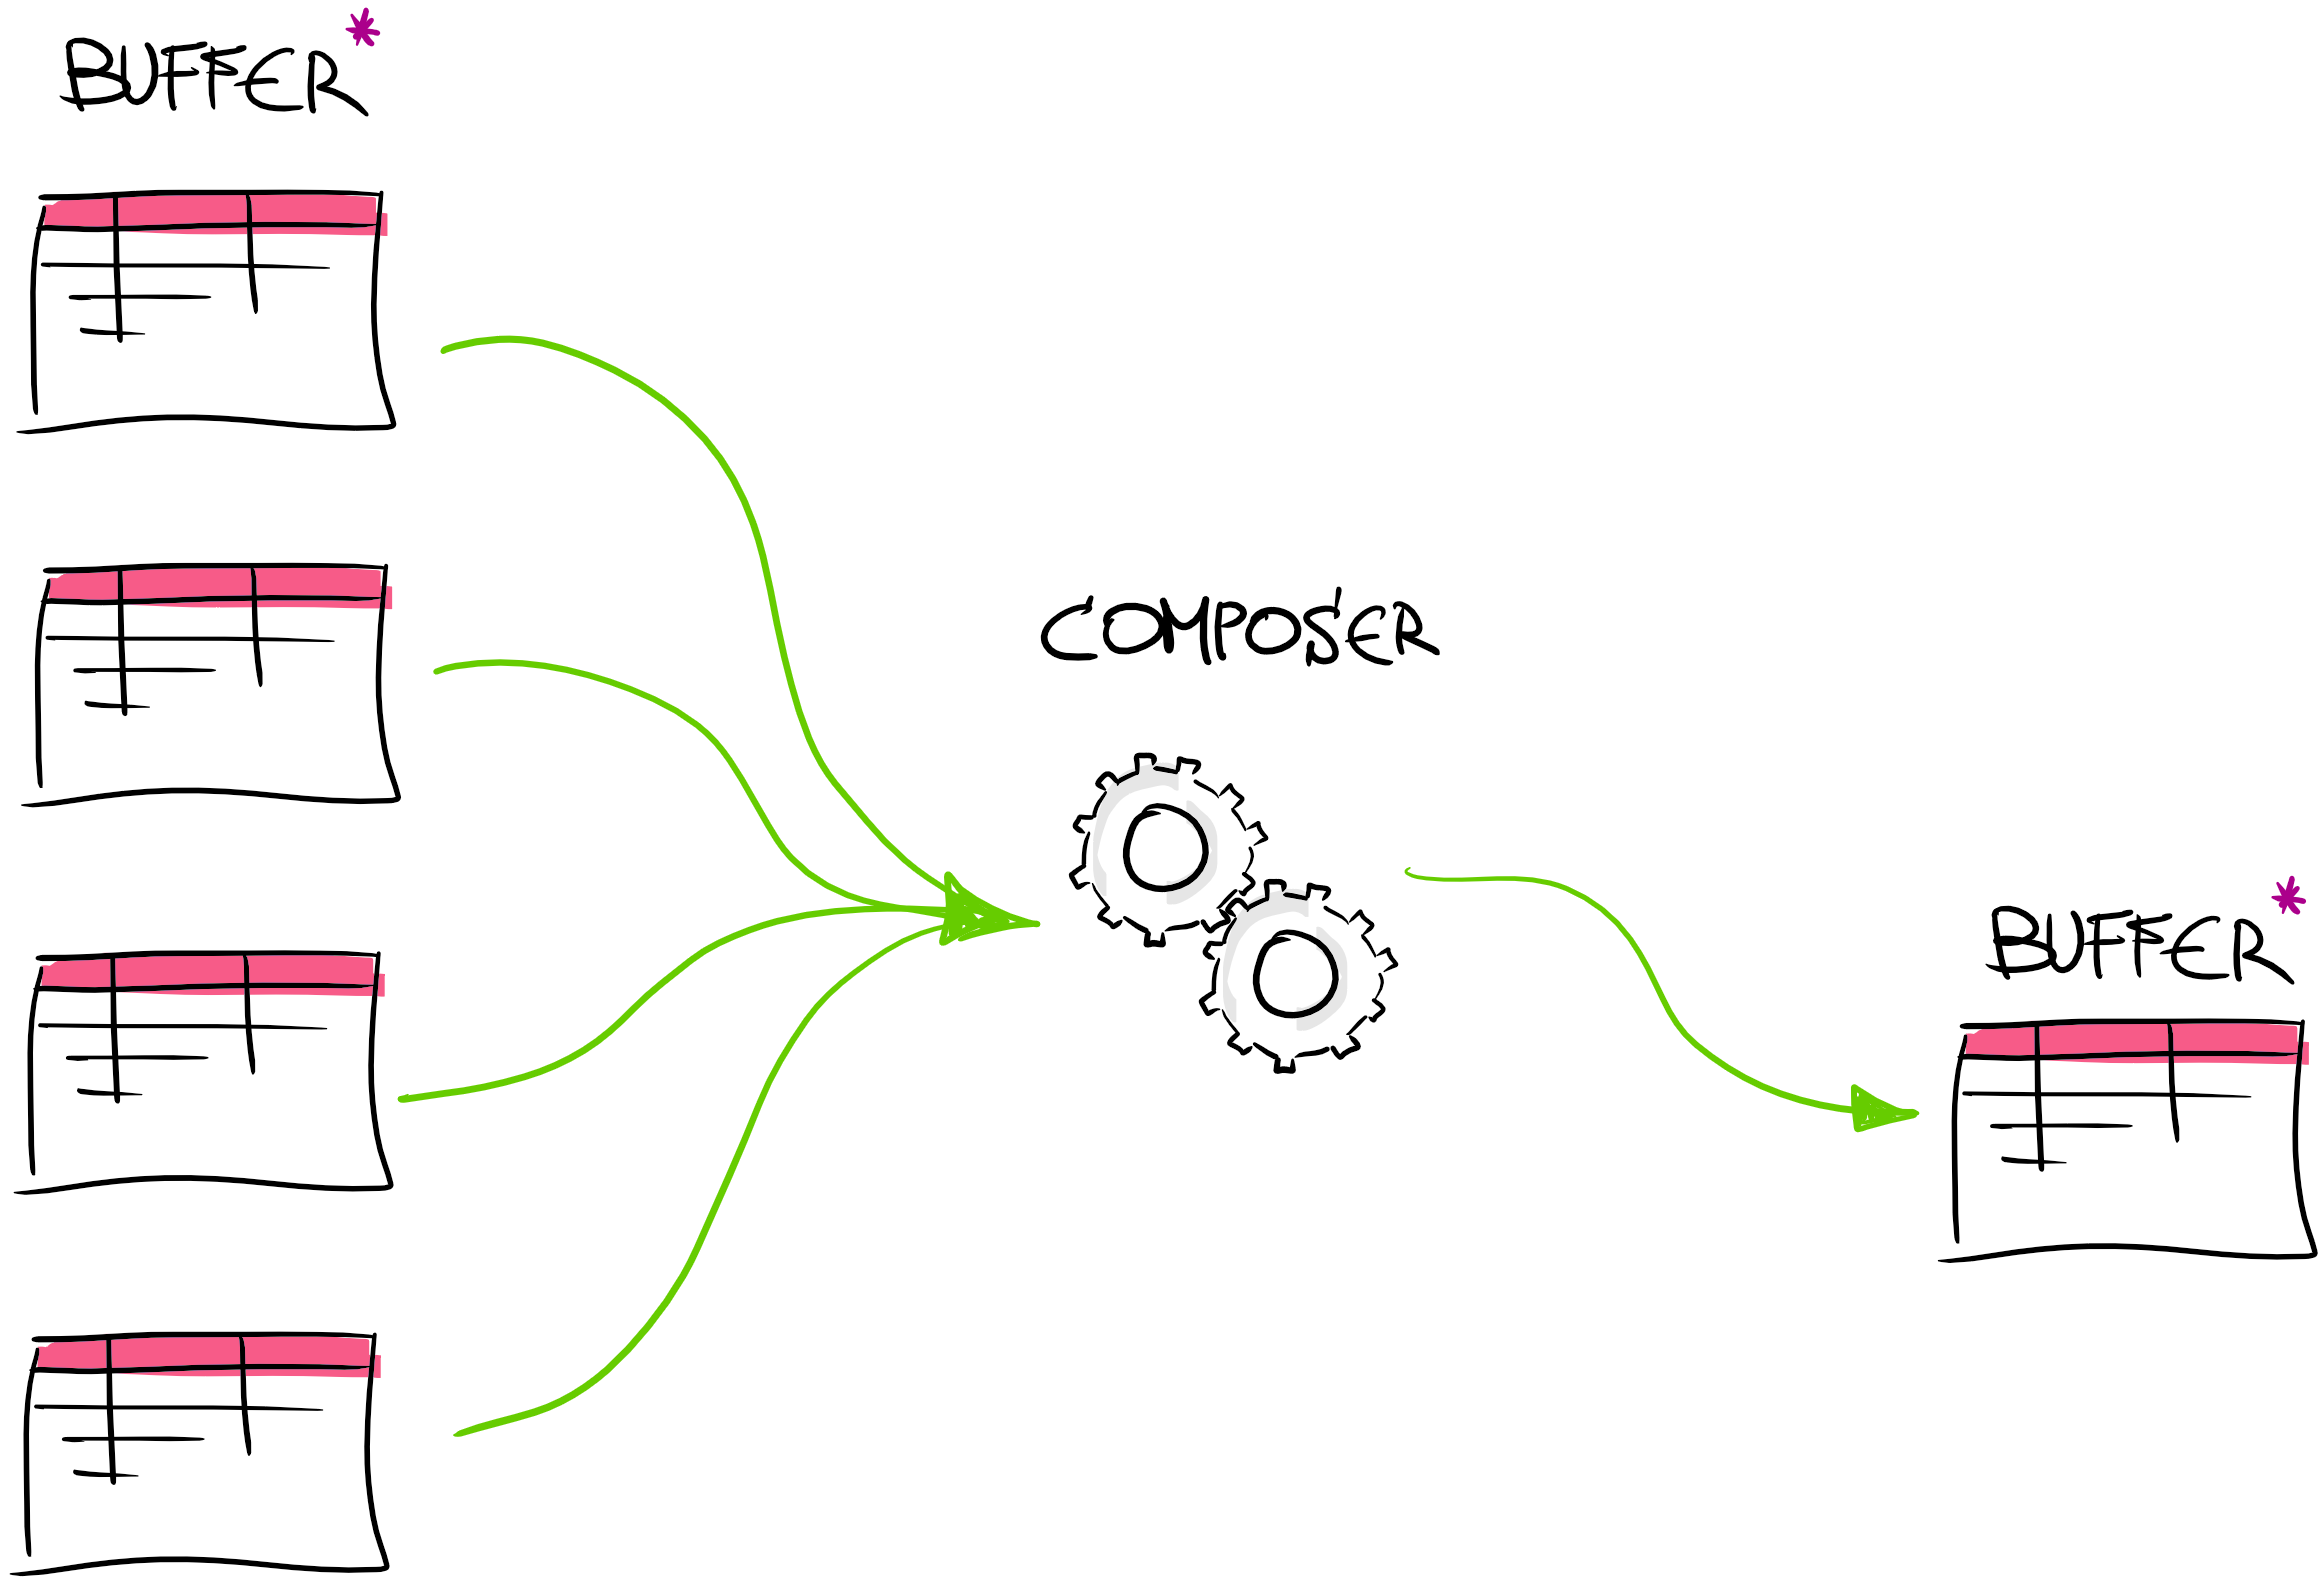
Essentially we re-architectured data flow into something like this:
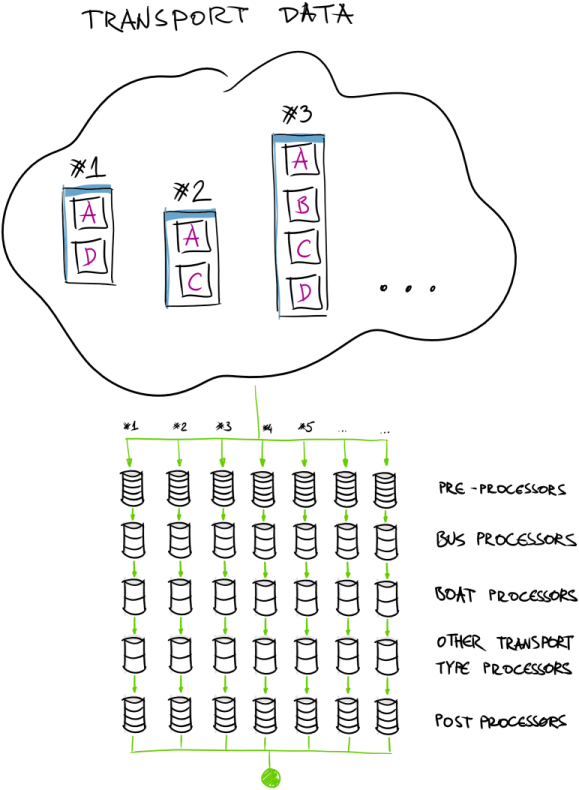
At the end - every pipeline was represented as sort of microservice that is capable of processing single transport unit. This seems like pretty descend solution! However - after few hundred runs (cold starts, and warm executes) we came to conclusion that Azure Functions Durable runtime (Durable Task Framework to be precise) spends a lot of time in infrastructure layer. “A lot of time” - for us is a definition of “longer than 1 second”. What I mean by this is that writing to Azure Storage (to persist state), loading that state later in function instance to work on it (“Fan-Out”), then after finish - storing it back, and then at the end - to compose together (“Fan-In”) took for us too long. As we are talking about near real-time processing - we could not afford this delay in our case.
Running in Parallel
So we had to find a solution to process data as fast as possible. At the end we decided to go with Azure WebJobs runtime that is hosted on Azure App Service. In this case we have more granular control over when and where we would like to introduce parallelization and concurrent data processing. We did many experiments on timing and parallelization degree tuning. After all we implemented parallel processing by transport type:
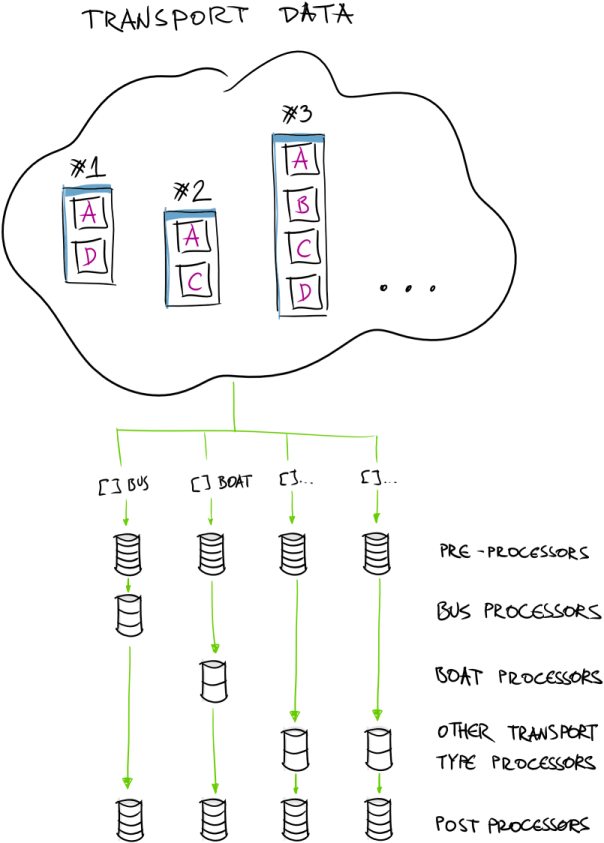
Running on Azure WebJobs (and having closer access to underlying CPUs) we were able to run processing code quite efficiently.
1
2
3
4
5
6
7
8
9
var buses = model.Items.Where(t => t.TransportType == TransportType.Bus);
var boats = model.Items.Where(t => t.TransportType == TransportType.Water);
...

var tasks = List<Task>();
var t1 = RunBusProcessors(ref buses);
var t2 = RunBoatProcessors(ref boats);

await Task.WhenAll(t1, t2, ...);
Running processing pipeline in Azure WebJobs infrastructure allows us to control when and how we do concurrent execution and avoids spending time in infrastructure to support parallel execution using Durable Azure Functions.
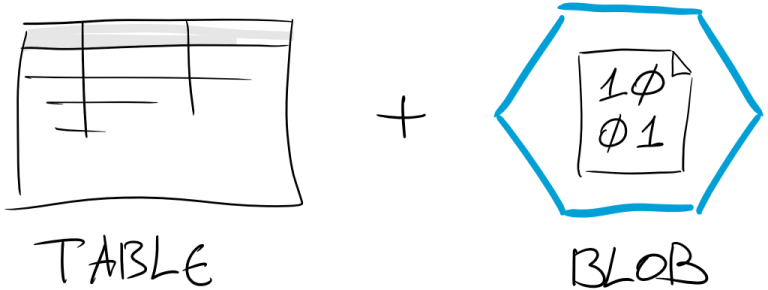
Building Time-based Index
What we call “Time-based Index” is actually a combination of table and blob storage for this large amount of data.
“Time-based Index” for generate data is pre-requisite for building feature that we will take a look at in next blog posts in this series. Feature is requiring data lookup by date and time.
As we noticed Azure Blob storage does not support search. CloudBlobContainer is supporting “direct” access to known blob by its name (for example method GetBlockBlobReference()). What we will need is - “return me closest blob (composed snapshot of the data) at 2020-01-21 04:55:23 UTC”. We can fire off this query to Blob Storage hoping that SDK will return required data.
What we ended up with is saving records in Azure Table Storage for easy lookup. Each table record has reference to blob for that moment in time.
1
2
3
4
5
6
7
8
9
10
11
12
public async Task StoreSnapshotAsync(
    byte[] data,
    string blobReference,
    DateTime requestDate)
{
    var container = await GetTimeMachineBlobContainerAsync();
    var reference = container.GetBlockBlobReference(blobReference);

    await reference.UploadFromByteArrayAsync(data, 0, data.Length);

    await SaveBlobReferenceInTableAsync(blobReference, requestDate);
}
Here blobReference could be any value. For easier maintenance in the future we are just using human readable format - $"TransportModel_{generatedAt:dd.MM.yyyy HH:mm:ss}".
1
2
3
4
5
6
7
8
9
10
11
12
13
14
15
16
public async Task SaveBlobReferenceInTableAsync(
    string blobReference,
    DateTime recordDate)
{
    var table = GetOrCreateTable();
    var newEntity = new BlobMetaDataTableEntity
    {
        PartitionKey = tablePartitionKey,
        RowKey = recordDate.ToString(PartitionKeyFormat),
        RecordDate = recordDate,
        BlobReference = blobReference
    };

    var insertOperation = TableOperation.Insert(newEntity);
    await table.ExecuteAsync(insertOperation);
}
This is how table record looks like (with reference to blob):
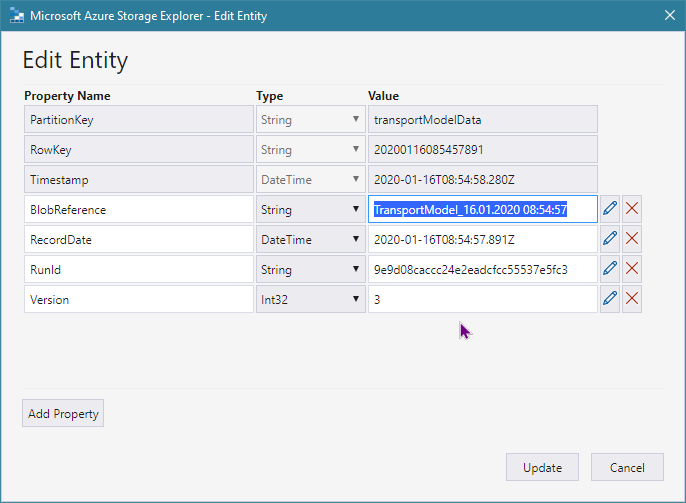
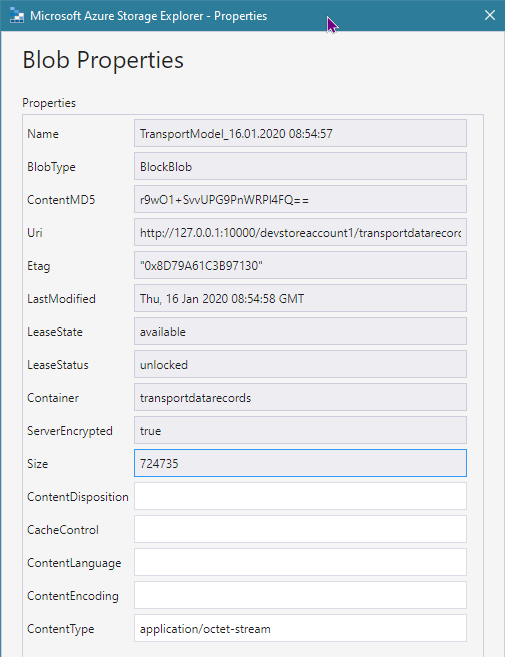
This is blob entity with meta-data:
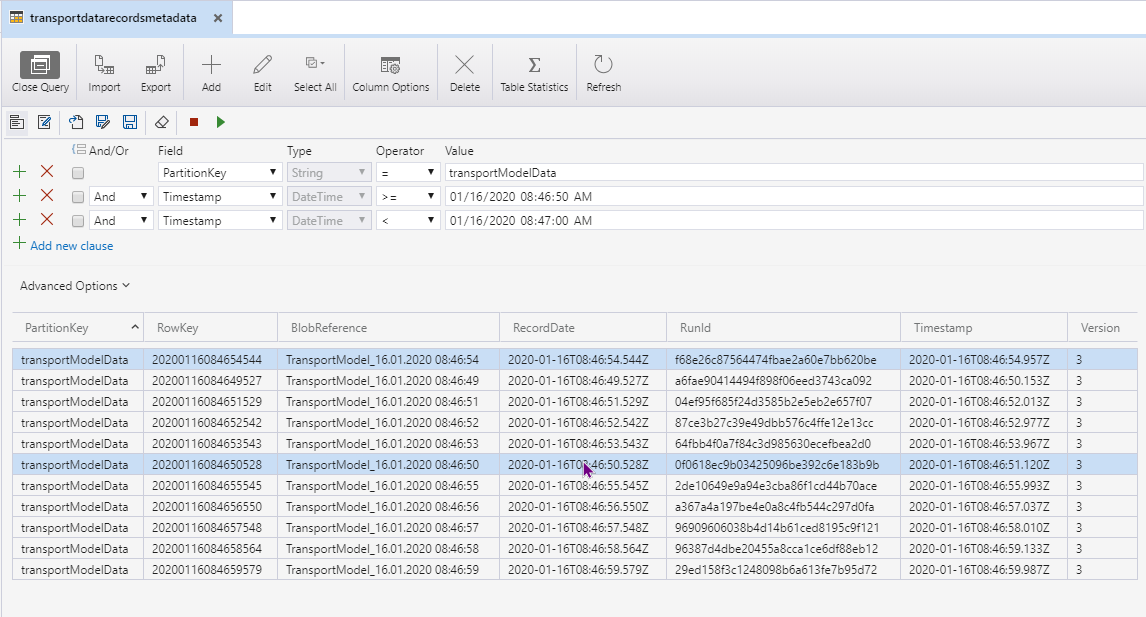
By using this table record + reference to blob allows us to do queries like this (to return all composed data snapshots between 08:46:50 - 08:47:00 on 2020-01-16):
We will see in future posts how we can make use of this data structure to build some cool features for the solution.
Happy coding!
[eof]
Comments powered by Disqus.